Friday, May 13, 2011

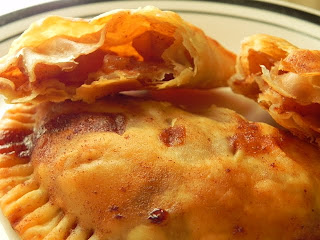
Apple Hand Pies


I will admit that I sometimes make a run through a certain fast food chain for a 2 for $1 apple pie. And I may or may not share with my little crumb snatchers (mostly share, cause since becoming mommy I never enjoy my meal without sharing); they are just so good. Now I always have apples in my fridge, and I had some puff pastry sheets in the freezer so I decided to make my own little version myself. This is a quick, easy way to satisfy that apple pie craving but be careful they are addictive. I first got the idea from Purple Foodie, and just had to give it a try.
I used a combo of Granny Smith, Golden Delicious and Gala; I also used my favorite puff pastry sheets that I use for empanadas.  You can certainly use your favorite pie dough if you want to go the fully homemade route; I just chose not to this time. I think this is the simplest apple pie recipe around.

Apple Hand Pies
3 medium sized apples, cored and diced (I used Granny Smith, Golden Delicious and Gala)
2 packs puff pastry rounds (I used Goya puff pastry for turnovers)
2 tbsp butter
3 tbsp of dark brown sugar
1 tsp cinnamon
½ tsp nutmeg
¼ tsp cloves
1 tsp corn starch
¼ cup apple juice
Pinch of salt

Preheat oven to 400 degrees. Spray sheet pan with nonstick spray.
In a bowl combine apple, brown sugar, cinnamon, nutmeg, cloves, corn starch and salt.
In a pan sauté apple mixture in butter until it starts to soften.
Add apple juice, and boil until sauce starts to thicken.
Remove from heat and let cool.
Lay out puff pastry round on a lightly floured surface.
Place a tablespoon of filling near center of pastry.
Moisten the edge of pastry with water and fold over to seal with fork (or fold over to give decorative edge).
Place on sheet pan and with a knife cut a few slits in tops to let out steam.
With a pastry brush, brush the tops with some of the sauce the apple are in.
Bake for 10-15 minutes or until pastry is golden brown. Makes about 24 hand pies.


These little hand pies were a nice little ode to the fast food kind, and just as addictive. I hope you try them soon, be blessed and enjoy.

Friday, May 6, 2011

Peanut Butter Cookies stuffed with Mini Peanut Butter Cups


I know you are probably thinking man that is a long title, but they are the simplest cookies. And they have a little surprise in the middle. Peanut butter cookies are in the top 10 of All time favorite cookies (true fact, I looked it up). I love a good, soft chewy peanut butter cookie with the fork marks on them and sprinkled in sugar. They bring me back to my aunt’s kitchen, making cookies and watching the Miss America pageants in my pj’s.
The peanut butter cookies use the same cookie base; they just have a little mini peanut butter cup in the center. Have you seen the new Reese’s Mini peanut butter cups? They are just too cute and dangerous to have in the house. You can throw back like 8 of them before you know what you’re doing.  Trust me; I got through almost half the bag before I remember they were for the cookies. So, just to be on the safe side get 2 bags; one for you and one for baking.

Peanut Butter Cookies
1 cup dark brown sugar
½ cup butter, soften
½ cup peanut butter (I used Smucker’s All Natural Chunky)
1 egg
1 ½ cups of All- Purpose Flour
1 tsp vanilla
½ tsp baking soda
½ tsp baking powder
½ tsp salt
20-24 mini peanut butter cups

Preheat oven to 375 degrees.

Combine flour, baking soda, baking powder and salt and set aside.

In your stand mixer fitted with a paddle attachment beat butter, brown sugar and peanut butter on medium speed.

Add egg and vanilla.

Reduce speed to low and add flour mixture.

Using a small cookie scoop; scoop some of the cookie dough.

Make a small pocket and place one mini peanut butter cup in the center.


Then fold dough to cover the cup. The recipe makes 20-24 cookies depending on the size of your scoops.


Bake 8-1o minutes or until edges or lightly browned.


I hope you enjoy these as much as my family did, because they are all gone. Be blessed and enjoy.

Thursday, May 5, 2011

Pinho's Bakery- My First Job

As you all know I love baking, that's what my blog is about after all (with a little cooking thrown in). So you shouldn't be too surprised that my first job was at a bakery. It wasn't a job that I went looking for, I got it quite by accident. I would make my to the bakery EVERYDAY after school and get lunch (because school lunch was gross).

 One morning I went in with my dad to get some doughnuts for my mom's salon, and Julie (the owner) told my dad that when I was old enough I was going to work for her. A few weeks later after my 14th birthday I was a Pinho's girl (that's what they called us at school). I loved it there; I got to make my own money, buy my own school clothes, and best of all sample all the yummy goodness of Pinho's. Pinho's is a Portuguese bakery, and allowed me to learn to appreciate all kinds of pastries and bread.

That is definitely where I started to love baking and food in general. I worked there for 2 years until my mom moved to Virginia. But, every time I get to go back I always make my way their to see Julie and the family. I miss them so much that for my first born's baby shower I had a Julie make my shower cake, and my BFF brought it down. Now that is some serious love. So if you are ever in the Northern New Jersey area, stop in Roselle and go to Pinho's Bakery . You won't be sorry you did. Be blessed.

Snickerdoodle Blondies


I love Snickerdoodle cookies-- buttery cookie rolled in cinnamon sugar. What’s not to love? But sometimes I’m not in a cookie mood. I am a big fan of blondies also. You know the underappreciated cousin of brownies. They are moist, chewy little brownie wannabes (minus the chocolate); and know I took them to another level by using my favorite little secret weapon Brown Butter. Brown butter is a little reduction I call blessed. I am finding ways to incorporate this into all of my baking recipes and even some savory ones. It is nutty and has a more concentrated butter flavor, that for me is just all in all goodness.
 Ok, Back to the blondies; and the Snickerdoodles.
Snickerdoodle blondies (just add brown butter and cinnamon sugar).
I have found recipes that use melted butter or just softened butter, but the brown butter keeps the blondie really moist. Just like with any good base you can add different things to it like chocolate chips, nuts, or anything you can think of and it will be good. The recipe isn’t too difficult and brings big flavor. When I made these blondies the first time my husband took a bite and knew he had to have another. They are addictive and don’t usually last too long in my house.

Snickerdoodle Blondies
Adapted from Martha Stewart

1 1/4 cups (2 1/2 sticks) unsalted butter
2 1/4 cups all-purpose flour
1 1/2 teaspoons baking powder
1 1/2 teaspoons salt
2 cups packed dark-brown sugar
1/2 cup granulated sugar
1/2 tsp cinnamon
Pinch of nutmeg
3 large eggs
2 1/2 teaspoons pure vanilla extract
2 tsp sugar
1 tsp cinnamon
Pinch of nutmeg

Directions

Preheat oven to 350 degrees. Spray a 9-by-13-inch baking pan with non-stick spray.

In a saucepan over medium heat, cook the butter until it turns golden brown; remove from heat, and let cool. Check out my Wordless Wednesday Post for more instructions.

Whisk together flour, baking powder, and salt.

In the bowl of an electric mixer, combine browned butter and both sugars; stir with a wooden spoon until combined. Attach bowl to mixer; add eggs.

Then using the paddle attachment, beat on medium-high speed until light and fluffy, about 3 minutes.

Add vanilla, and beat to combine.

Add flour mixture.

 Mix until thoroughly combined, and pour into prepared pan. Sprinkle with cinnamon sugar mixture.

Bake until a toothpick inserted in the center comes out clean; 35 to 40 minutes. Transfer to a wire rack to cool completely before turning out of pan onto a cutting board.


I hope you love Snickerdoodle Blondies as much as I do. Be blessed and enjoy!

Tuesday, May 3, 2011

Wordless Wednesday- Brown Butter

Place butter for recipe in pan over medium heat.

Stir butter with wooden spoon while melting.


Butter will start to develop brown bits at the bottom. This is the goodness.
Here is the final product. You can use this in plenty recipes from cookies to banana bread.

Be blessed and enjoy!
Related Posts Plugin for WordPress, Blogger...