Wednesday, April 27, 2011

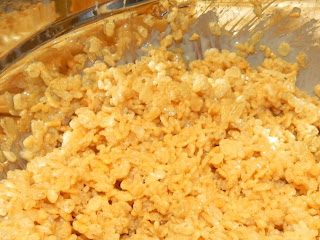
Wordless Wednesday-Chocolate Rice Cereal Snacks

Materials Needed

Spray pan to prevent sticking.

Melt butter and marshmallows.

Add Rice cereal.

Add a mix of chocolate.

Mix to combine.

Spread into pan.

Cover with parchment paper.

Press down with another pan.

Remove from pan and cut into squares.

Be Blessed and enjoy.

Friday, April 22, 2011

Crumb Cake


Crumb Cakes hold a special place in my heart. Now, I am a Jersey girl always and forever. I was born there and spent half my life there. I don’t get to go back as often as I like, as a matter of fact I haven’t been there since my little man was 1 (he just turned 7). But, wherever I get a chance to go there is always one place I HAVE to go is Pinho’s Bakery. I worked there in high school up into the time I moved to VA. I loved it; during the summers I worked the morning shifts and there is nothing better than the smell of fresh warm pastries. Every morning bring the big sheet pans of crumb cake and other warm baked goods; did I mention the best perk of my job whatever I ate on the job was free. So my breakfast would include a warm square of crumb cake with a double shot of espresso (Don’t judge. 5:30 is early for a high schooler, especially during the summer).
Back to the crumb cake; I loved the soft tender cake, to the thick crumb topping with the powdered sugar. So when I went to my favorite place, my local library, and found the crumb cake recipe in Martha Stewart's Baking Handbook I had to get it. There are actually quite a few recipes I will be trying from this book so be prepared. If you don’t know what a crumb cake is let me explain; it is a coffee cake with a thin layer of cake and a thick layer of crumb mostly found in the New York and New Jersey area. A quick tip: I made the Crumb Topping first and placed it in the fridge until cake batter was done. This way you will get better clumping of the crumb. I also don’t have a pastry cutter so I just used my hand held mixer to bring the crumb topping together.

Classic Crumb Cake
From Martha Stewart’s Baking Handbook
Crumb Topping
3 cups all- purpose flour
1 cup light brown sugar
1 tbsp cinnamon
1 ½ tsp coarse salt
3 ½ sticks unsalted butter, room temperature

In a medium bowl, whisk together flour, sugar, cinnamon and salt; cut butter in using a pastry blender or hand held mixer, until large, moist clumps form. Topping can be refrigerated in an airtight container for up to 2 weeks.


Cake
1 ¼ sticks (10 tbsp) unsalted butter, room temperature
2 ½ cups all-purpose flour
1 tsp baking powder
1tsp baking soda
½ tsp salt
1 cup sugar
3 large eggs
1 tsp pure vanilla extract
1 ¼ cups sour cream
Powdered Sugar for dusting (Optional)

Preheat oven to 350 degrees. Generously butter and flour your 13x9 pan or us a baking spray like Pam. Whisk flour, baking soda, baking powder, and salt together in a bowl; set aside.
In the bowl of an electric mixer fitted with the paddle attachment, beat butter and sugar until light and fluffy, about 4 minutes, scraping down the side of the bowl as needed. Add eggs on at a time until incorporated after each addition. Mix in vanilla. Add flour mixture and sour cream; beat until just combined.
Spoon batter into prepared pan, and smooth with an offset spatula. Sprinkle the topping evenly over the batter. Bake, rotating halfway through until cake is golden brown and toothpick comes out clean, 40-50 minutes. Transfer to wire rack to cool. Before serving sprinkle with powdered sugar, if using.


This crumb cake is great to have in the morning with your cup of Joe, in the afternoon just because or in the evening with a nice cup of tea. Any time of day is good for enjoying this treat, be careful of crumb snatchers like the ones in my house. I hope you enjoy this wonderful treat, maybe for brunch this Easter Sunday. Be blessed and enjoy.


Tuesday, April 12, 2011

Oven Roasted Pulled Pork Sliders


I like a good barbeque as much as the next person. Usually it involves going to a restaurant that employs the low and slow method, and all I have to do is enjoy. But due to a miscommunication between me and the hubby (not sure how a pork roast and a picnic shoulder resemble one another).

I am ready to take on this task. I will note that we do not have a grill or a smoker, because upon moving to our new home my husband decided he didn't want to take any of that stuff along. So I was forced to find an alternative method of cooking. All I have to say is this who says you need a smoker to make some delicious Pulled Pork? Thanks to a fabulous recipe by Tyler Florence (and a lot of patience) I did it.

I was pretty excited too; I pulled that big ol' hunk of meat out the fridge and got to work. I went with a dry rub rather than a marinade or a brine; which is what I usually do with a roast. Now if there is one thing you have to consider when making pulled pork, it is the sauce. If you've been to any good barbeque places you know that every region has their own sauce. There's mustard based, vinegar based or tomato based. I tend to lean more toward the tomato based sauces because, they are usually sweeter. Tyler's recipe used a mustard base sauce, but you can use what you like. I ended up doing a combo and it was really good.


Oven-Roasted Pulled Pork Sliders

Based on Tyler Florence recipe

Dry Rub

3 tbsp paprika (I used smoked)

1 tbsp garlic powder

1 tbsp brown sugar

1 tbsp dry mustard

3 tbsp coarse salt

1 (5 -7lb) pork shoulder or butt


Cider Vinegar Barbeque Sauce

1 ½ cups cider vinegar

1 cup yellow or brown mustard

½ cup ketchup

1/3 cup packed brown sugar

2 garlic gloves, smashed

1 tsp salt

1 tsp cayenne pepper

½ tsp ground black pepper

12 hamburger buns or sliders


  1. Mix the paprika, garlic power, brown sugar, dry mustard, and salt together in a small bowl. Rub the spice blend all over the pork and marinate for as long as you have time for, as little as 1 hour or up to overnight, covered, in the refrigerator.


Preheat the oven to 300 degrees F.


Put the pork in a roasting pan and bake for about 6 hours. Basically, roast the pork until it's falling apart and an instant-read thermometer inserted into the thickest part registers 170 degrees F.


To make the barbecue sauce: combine the vinegar, mustard, ketchup, brown sugar, garlic, salt, cayenne, and black pepper in a saucepan over medium heat. Simmer gently, stirring, for 10 minutes until the sugar dissolves.


Remove the pork roast from the oven and transfer to a large platter. Allow the meat to rest for about 10 minutes. While still warm, take 2 forks and "pull" the meat to form shreds. Using 2 forks shred the pork by steadying the meat with 1 fork and pulling it away with the other. I just used my hands, and sampled as well. Put the shredded pork in a bowl. Pour 1/2 of the sauce on the shredded pork and mix well to coat, then I used a good bottle sauce like Sweet Baby Rays.


Now when I have pulled pork I like coleslaw, but I used all my homemade skills on the pulled pork and one of the sauces, so I bought a bagged broccoli slaw mix (change it up a bit), but I did make my own dressing.


Broccoli Coleslaw

2 bags of broccoli slaw mix


Dressing

2/3 cup Miracle Whip

3 tablespoons vegetable oil

1/2 cup white sugar

1 tablespoon white vinegar

1/4 teaspoon salt or celery salt


  1. Whisk all ingredients together, pour over slaw and toss to coat.


This was my "spring into Spring" meal. Now I know that barbeque is usually a summer time thing, but spring is close enough for me. I hope you give this a try and taste a little bit of summer in the spring.


Be blessed and enjoy.


Friday, April 8, 2011

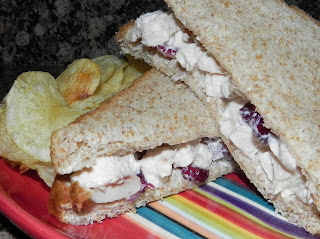
Roasted Chicken Salad


As the weather starts to warm up I tend to make a lot of cold salads. One of my favorites is this Chicken Salad recipe; I don’t follow the normal rules of poaching the chicken. No, I brine then roast the chicken. What is brine you ask? A Brine is a salt/sugar solution used to impart great flavor to certain types of meat, like chicken, turkey and pork. The size of the size of meat will determine how long you will leave it in the brine. I usually brine the chicken in the morning and place in the fridge until ready to cook.
My family loves this chicken salad recipe. The kids are usually eating the chicken as I cut it up. It is perfect for lunch or even dinner on hot summer evenings, and my husband has even been known to eat it right out the container. I recently brought a large container for my church’s Women’s Meeting, and there was none to bring home.
The recipe is pretty simple and well worth the wait of brining and roasting. You can make it the day or night before a party, which gives time for the flavors to really settle in. I use Craisins and red onion in my Chicken Salad, but you can use any thing you like to yours.

Roasted Chicken Salad
2lbs bone in chicken breast
1 cup of Craisins
½ cup of finely diced red onion
About ¼ cup of miracle whip or your favorite mayo (I don’t really measure, I go by creaminess)
About ¼ cup of sour cream
Brine for Chicken
1 cup kosher salt
¼ cup brown sugar
1 tbsp ground black pepper
2 tsp dried Italian seasoning
1 tsp garlic powder
1tsp dried oregano
½ tsp red pepper flakes
1 gallon of water

To brine Chicken, combine all spices and sugar in a large container.
Add about 2 cups of hot water. Stir until salt and sugar is dissolved.
Fill the container with cold water then add chicken and cover.
Place in the refrigerator for at least an hour. The longer you leave it in brine the more salt drawn into the meat.
To roast the chicken, preheat oven to 375 degrees.
Remove chicken from brine and place on cookie sheet and pat dry.
Roast chicken for 30-40 minutes or until internal temp is 170 degrees.
  

Remove chicken from oven and let cool.
When chicken is cool enough to handle, move to a cutting board.

Remove skin and bones, chop into small chunks.


Add diced red onion and Craisins to chicken in a bowl.


Next, add miracle whip and sour cream to bowl. Add little at a time until desired creaminess is reached.


Refrigerate until ready to serve.


I hope you enjoy this chicken salad recipe at your next picnic or just for lunch. Be blessed and enjoy.

Thursday, April 7, 2011

How to Store Fresh Ginger


How often do you steer away from a recipe because it has ingredients that you don’t use often?
Maybe you think something like,
·         What do I need?
·         Where can I find it?
·         What is it supposed to look like?
·         I only need a little bit, so what do I do with the rest?
·         What else can I use this in?

 Now, let’s talk about an ingredient you might not use in all your dishes. Ginger or Gingerroot is great in so many things and can be stored in the freezer until you need it again. There are so many ways you can use this ingredient that you might not have even thought of. It also has so many medicinal properties; ginger was my best friend during my pregnancies.
 But, first let’s start at the store.
 Ginger comes in many sizes and is sold by the pound. Determine how much you are going to need for a recipe and go from there; you can break a piece from a larger root if you don’t think you need that much.
You do it with bananas all the time, so don’t feel bad.

Fresh ginger root


When you get home if you are going to use it right away (within a day or so) you can leave it out. If you don’t need to use it right away cut into smaller pieces, wrap it in foil, place in a small storage bag and place in the freezer.

Cut into smaller pieces

wrap in foil

Place in food storage bag and place in freezer.


When you are ready for the ginger in your recipe, simply take a piece from the freezer and let it come to room temperature. Then peel it using the back of a spoon to remove the outer skin. The ginger is now ready to use in any recipe you need.
 I love to grate some in to my stir-fry dishes or steep some in hot water with lemon for tea when I don’t feel well. There are so many uses for fresh ginger; I hope this helps you take a chance on an unknown ingredient when shopping and/or attempting a new dish. Be blessed.


Related Posts Plugin for WordPress, Blogger...